The author is professor of animal sciences at Kansas State University, Manhattan.
At our 2009 annual Dairy Cattle Reproduction Council meeting, Maarten Drost, D.V.M., professor emeritus, University of Florida, spoke about on-farm management of obstetrics. His expertise and perspective come from his vast experiences as a bovine practitioner and academician. Correct procedures and management of the cow during calving has far-reaching implications for the success of your A.I. breeding programs. Let me share with you some of these important principles highlighted by Drost.
Often, supervision of calving heifers and cows is delegated to farm personnel who are the least prepared and skilled in dealing with potential calving problems. Those assisting expectant mothers should follow simple guidelines for cleanliness, reasonable force, and common sense.
Calving difficulty rarely occurs at predictable times when adequate help is available. Both haste and delays in assisting the cow may lead to injury and harm to both cow and calf. Drost recommends that one solution is for veterinary practitioners to develop a calving management program to assist his dairy clients. A good program not only requires training of personnel but having appropriate facilities for the calving process.
Calving area
Calving processes
The calf can live for about 8 to 10 hours in the uterus after the beginning of true labor (rupture of first water bag). Actual expulsion of the calf takes 1 to 4 hours in a cow and 2 to 6 hours in a heifer. The fetal membranes (afterbirth) should be expelled normally in 1 to 8 hours; otherwise they are considered to be retained.
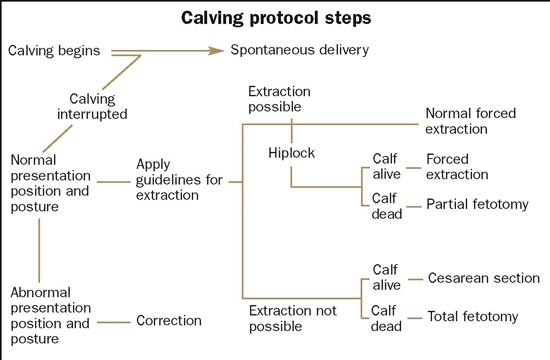
When normal calving does not occur, determine the cause and follow the calving protocol illustration above. The flow chart provides helpful guidance. For numerous helpful illustrations to assist you in solving abnormal presentations, please consult Dr. Drost's Visual Guide to Theriogenology at http://drostproject.vetmed.ufl.edu.
The golden rules of obstetrics are cleanliness and lubrication. Properly assisting those expectant mothers with loving care will pay off in subsequent improved pregnancy outcomes.
On-Farm Calving Protocol
Click here to return to the Animal Care E-Sources
100210_98
At our 2009 annual Dairy Cattle Reproduction Council meeting, Maarten Drost, D.V.M., professor emeritus, University of Florida, spoke about on-farm management of obstetrics. His expertise and perspective come from his vast experiences as a bovine practitioner and academician. Correct procedures and management of the cow during calving has far-reaching implications for the success of your A.I. breeding programs. Let me share with you some of these important principles highlighted by Drost.
Often, supervision of calving heifers and cows is delegated to farm personnel who are the least prepared and skilled in dealing with potential calving problems. Those assisting expectant mothers should follow simple guidelines for cleanliness, reasonable force, and common sense.
Calving difficulty rarely occurs at predictable times when adequate help is available. Both haste and delays in assisting the cow may lead to injury and harm to both cow and calf. Drost recommends that one solution is for veterinary practitioners to develop a calving management program to assist his dairy clients. A good program not only requires training of personnel but having appropriate facilities for the calving process.
Calving area
- Calving in a clean pasture or a clean, well-bedded individual pen close enough to permit supervision is the gold standard.
- Facilities must be clean but need not be new or fancy. Shelter from inclement weather with a source of running water and storage for instruments and supplies is a good idea.
- A well-bedded area with good footing with some kind of restraint other than a working chute is essential. A head catch with a hinged panel gate that is movable and allows sufficient space for the cow to lie down and for personnel to work behind the cow works well.
Calving processes
- About 50 percent of heifers and 70 percent of cows spontaneously deliver their calves without assistance.
- Impending signs of calving include udder development, enlargement and softening of vulva, relaxation of pelvic ligaments (tail head appears to raise), and eventual softening and enlargement (dilation) of the cervix.
- Rupture of the first water bag (allantois) initiates the onset of labor followed by a temporary weakening or cessation of straining which resumes as the second water bag (amnion) enters the vulva. Its contents lubricate the birth canal after it ruptures.
The calf can live for about 8 to 10 hours in the uterus after the beginning of true labor (rupture of first water bag). Actual expulsion of the calf takes 1 to 4 hours in a cow and 2 to 6 hours in a heifer. The fetal membranes (afterbirth) should be expelled normally in 1 to 8 hours; otherwise they are considered to be retained.
When normal calving does not occur, determine the cause and follow the calving protocol illustration above. The flow chart provides helpful guidance. For numerous helpful illustrations to assist you in solving abnormal presentations, please consult Dr. Drost's Visual Guide to Theriogenology at http://drostproject.vetmed.ufl.edu.
The golden rules of obstetrics are cleanliness and lubrication. Properly assisting those expectant mothers with loving care will pay off in subsequent improved pregnancy outcomes.
On-Farm Calving Protocol
- Move springers to calving area 3 to 4 weeks before due date.
- Post a list of due dates.
- Observe for signs of calving first thing in the morning and just before dark and every 2 to 4 hours in between.
- Labor starts when the first water bag breaks. Allow cows 1 to 4 hours and heifers 2 to 6 hours; some progress should occur during this time.
- When no progress occurs:
Examine birth canal after washing the cow and your arms. Remember: cleanliness and lubrication.
Determine if calf is presenting head first or backwards and whether both legs are present and extended. - Rules for deciding if sufficient room exists to pull calf:
When head first: If you can pull both pasterns 5 inches outside the vulva.
When backwards: If you can get both hocks to show at the vulva. If not, call your veterinarian. - Put the cow in an area with sufficient space to work. Halter and tie low to a post. Only pull when the cow is straining.
- After delivery, ensure that the calf is breathing (if not, clean and tickle nostrils, dump cold water on head); check cow for birth canal tears and another calf; give cow 20 IU of oxytocin; check udder for colostrum and mastitis; treat calf's navel with iodine or chlorhexidine; ID calf and ensure that it gets colostrum.
- Record calving difficulty score.
- Supplies needed:
- Rope halter
- Tail rope
- Currycomb
- Hose with nozzle
- Soap
- Buckets (two)
- Lube
- Vaseline
- Nolvasan
- Tincture of iodine (7 percent) or a 2 percent solution of chlorhexidine
- Two short chains (30 inches)
- One long chain (60 inches)
- Calf puller
100210_98